The BRCKs have been working great on this trip; pop in a data enabled SIM card and a few minutes later the solid blue ring tells us that we are online. It is a bit surreal to be corresponding with people back in the office while we are travelling through the heart of Africa. I can watch Baobab trees go by, wave back at people resting in the shade to escape the mid-day heat and catch a glimpse of a chicken fluttering out of the way all while answering email.
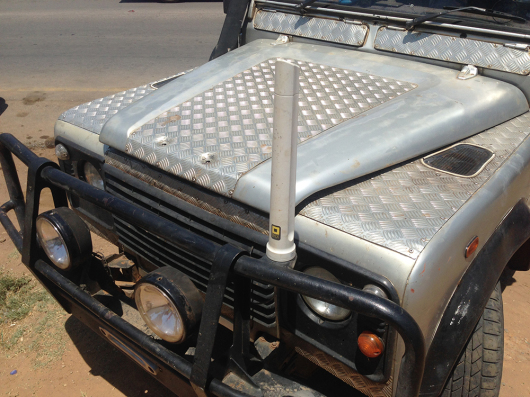
We have a nice big omni-directional antenna from Poynting mounted on the bumper of our Defender and a dual band amplifier in the cab to boost the signal when things really get weak. The antenna is awesome! It has seen some super rough roads, some unexpected speed bumps (yes, Defender 110’s can fly!), scorching heat and heavy rains over the last 8000km and survived no problem.
So connecting to a cellular signal has not been a significant issue this trip. However, getting “data enabled SIM” is an adventure in every new country. We have compiled a bit of a travel guide to help people in similar situations starting with “data enabled SIM card.” The general procedure for getting on line looks something like this:
1. Buy a SIM card. When entering into a new country, usually while waiting for paperwork, I would find a hawker selling SIM cards a couple of scratch cards of airtime. It’s not my forte but I would try to negotiate the price down as much as I could but we were often pressed for time.
In Zimbabwe we paid $5 (Zimbabwe has reverted to using USD) for the SIM and another $10 of credit, in Mozambique we paid 500 Metcali (???) for the SIM and 2000 for airtime (which later we learned transferred into 512MB), in Malawi the SIM card was and in Tanzania 2000TZS. Currently Kenya, Tanzania, Zambia require some sort of identification (such as a passport) to buy a SIM so that the government can track phone numbers, ostensibly for security reasons. Eventually most countries will probably adopt this.
2. Activate the SIM card. For example, TNM in Malawi involved dialing 100 which give and introductory recording. Econet in Zimbabwe had no activation step. The instructions for Vodacom in Tanzania said *104# but since we had to register the card when we purchased it we are not certain if this is actually required.
We are pushing hard to this functionality (as well as steps 3, 4 & 5) directly on the BRCK but for now we have a ubiquitous Nokia candy bar phone for this purpose. You could almost certainly use the salespersons phone as well.
3. Add the credit as airtime. In Kenya we can add it directly as data but on this trip we always added it as airtime first. This step is usually straight forward and the instructions are right on the scratch card. For example, in Malawi TNM the code is: *111*scratch card number # and the only thing that changes
4. Activate data on the phone. Often data needs to enabled for the SIM. The instructions for TZ Vodacom are to SMS “INTERNET” to 15300
5. Buy a data bundle with the airtime. This is usually done through a USSD menu. We will spare all the details and the menus can change at any time but for example in Malawi on TNM:
- Access the menu is accessed with *100#
- Select “2” for “Bundles”
- “1” for “Available Bundles”
- “3” for “Internet”
- Then select which bundle. (We had only purchased 2000 Quacha of credit so we were able to get 512MB)
Now it’s ready! Below are a few of the SIM’s we collected during the course of the trip.

(At this point we often popped the SIM in the Firefox Flame phone. This allowed us to verify what type of data connection is available; i.e. Edge or 3G. And using a smart phone also allows us to check which APN the phone uses so we verify our BRCK table of APN settings.)
Put the SIM in the BRCK and wait for it to connect!
That all sounded quite straightforward; in reality there are many variables. So here are a few other suggestions & comments:
- The USSD menu may or may not be in English but we always found the English option so keep trying. Spend a few minutes getting familiar with the options in the menu.
- If something doesn’t work; try again a few times before trying something else; many times the network did not behave and the menu would time out or our credit would not go through. So we would try and try some more until eventually it worked.
- In Tanzania we had to re-registered our SIM simply because it was not working and so we lost a day with that card.
- Budget half an hour or more to register and get the SIM card all working; ideally with the salesperson. We often thought it would be a quick process but in reality it always took time, for one reason or another.
- Keep the little instruction sheet that comes with the SIM and try to get as many shortcuts as you can from the locals. Things like check data balance, check airtime credit, etc.
We are aiming to streamline this process to save the user from all this hassle, especially for travelers. We would like to give someone a BRCK in Nairobi, maybe even with SIM cards from all the countries they will visit, and all they need to do is pop in a new card for each country; BRCK takes care of the rest. In the meantime hopefully this guide was somewhat helpful.


