You’ve heard the expression about missing the forest for the trees. It happens to the best of us. It even happens to tiny little hardware startups in Kenya. We have been so focused on the details of getting our product to market that we weren’t able to put the BRCK – new in the box – into the hands of real users and get their feedback on registering and configuring the BRCK. In all fairness, we only received our first shipment of production BRICKs in Nairobi on Friday – we have been doing all of our development and testing with about 12 overworked, under-appreciated, pre-production units. I’m not trying to make an excuse for us missing one of our core competencies. Just praying for a little understanding as we work through the user experience (UX) of interacting with a BRCK.
The initial user reports started trickling in over the last week and half as we have been ramping up our shipping volumes. Initially the feedback was very positive with comments on the packaging, the quality of the BRCK, even the colors of the charging cable. However, there were also those occasional but niggling little comments on some frustrations with getting the BRCK setup. We did get some pretty brutal feedback from our internal family at Ushahidi – who received the initial BRCKs from the production line – but we did somewhat discount their experiences based upon small fixes and patches that we had subsequently pushed into the production process.
We then started receiving some more concerning reports from real customers as our support systems started getting put into service. Questions about what the lights meant, whether the BRCK was powered on, how to properly insert SIMs/chargers, etc. Some of the questions were understandable. Others, however, seemed peculiar given how easy the BRCK is to setup – or so we thought. You see, most of us have set the BRCK up hundreds of times – personally I’m inching towards 1,000 setups. We start it up, watch the sequence of lights, allow the BRCK to navigate us to the registration page, enter our information, and wait patiently for the new settings to be applied and the Internet to begin streaming through our browsers. We test with Ethernet cables, SIM cards, and even WiFi-bridging to our office routers. Sure we run into issues, but these issues get logged in our bug tracking system, assigned to a resource, fixed, deployed, and retested. We are professionals; we know how to make robust technology – or so we thought.
We quickly noticed that some of the early adopters had bad experiences setting up their BRCKs, and with a foreboding ounce of humility that we decided we needed to throw a few more factory-fresh BRCKs in front of some of the great tech folks that hang around in Nairobi and record their experiences and observations with unboxing and setting up a BRCK. We started by heading down one floor to the amazing ladies who run Akirachix.
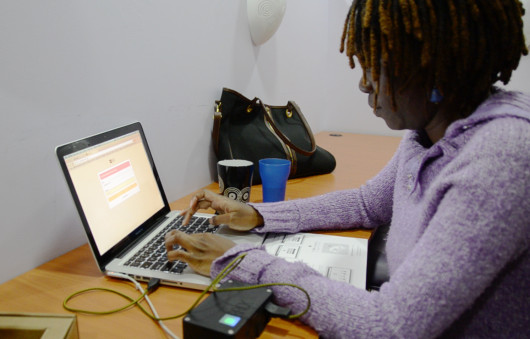
Judy from Akirachix setting up a BRCK
They’re super smart, super tech-savvy, and passionate about technology from Kenya – especially BRCK. It was just a little embarrassing when they struggled with even getting the BRCK powered on. We then brought in one of our key local business partners, Upande, who have been chomping at the bit to get their hands on BRCKs to begin integrating a bunch of sensors and gadgets. We sat their principal down in our conference room with a running video camera, brought in the entire BRCK team to watch him, and then furiously started scribbling on notepads. It wasn’t pretty.

Mark from Upande setting up his BRCK
Things that are completely obvious to us were completely unobvious to the user. The user guide – while well designed – failed to communicate a handful of really key pieces of information that provide context to a user setting up their BRCK. The amazing lights – which get lots of oohs and aahs – mean absolutely nothing without a clear explanation. We quickly huddled the team, watched the tapes, reviewed the play-by-play notes, and grumbled as we saw the small but significant omissions in our user experience. Nothing fatal. Honestly, nothing that significant. But, for us and our users, a perceptible distraction from the quality of the hard work that we have put into BRCK over the last 18 months.

Emmanuel and Jeff reworking the setup process
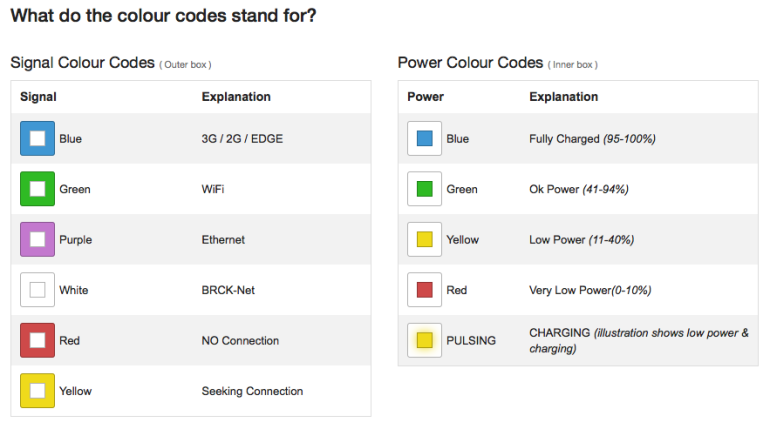
Undeterred in our mission – or our pursuit of excellence – we devised some immediate changes to the registration process that should dramatically simplify the setup experience. We also designed and had printed a color chart to explain the lights on the BRCK – we are including these in the box going forward and posting them in the mail to everyone who already has BRCKs.
Because the UX is so important we have placed the production and shipping on a brief pause while we sort through these handful of changes. I know we won’t get everything resolved to your, or our, demanding standards but hopefully we can move the needle in the right direction.
Although these changes will have the biggest impact on customers who haven’t yet received their BRCKs, we did want to outline a few of the critical aspects of setting up a BRCK that have proven to be hurdles in the process for clients who already have their BRCKs:
1) The Spinning Lights – in short, the outer LEDs are the connectivity indicator and the inner LED is the battery indicator. The battery light will be on (and flashing) while charging but this does not mean the BRCK is powered on. Here is a link to our forum post on the meaning of the various colors (http://forums.brck.com/t/a-guide-to-the-light/108/2).
2) USB Charging Connection – the charging connection for the BRCK is under the same flap as the SIM slot – the farthest slot on the right. What is tricky is that the cable must be oriented with the USB logo facing down. This is opposite of many devices and can cause some confusion. The other end of the cable can be plugged into any USB charging source (e.g. laptop, wall charger, another BRCK).
3) Local vs Cloud Dashboard – there are actually two dashboards that are part of the BRCK. For most activities, the Cloud Dashboard is the go-to location but it does require connectivity to the Internet to access. You can access the Cloud Dashboard at http://my.brck.com. The Local Dashboard is provided solely to assist with getting a connection. You can access the Local Dashboard at http://local.brck.com (also at http://192.168.69.1). When navigating to the Local Dashboard you may see a spinning BRCK logo that indicates the BRCK is transitioning to a mode where the Local Dashboard can be accessed. Please be patient, it can sometimes take awhile for the BRCK to make this transition.
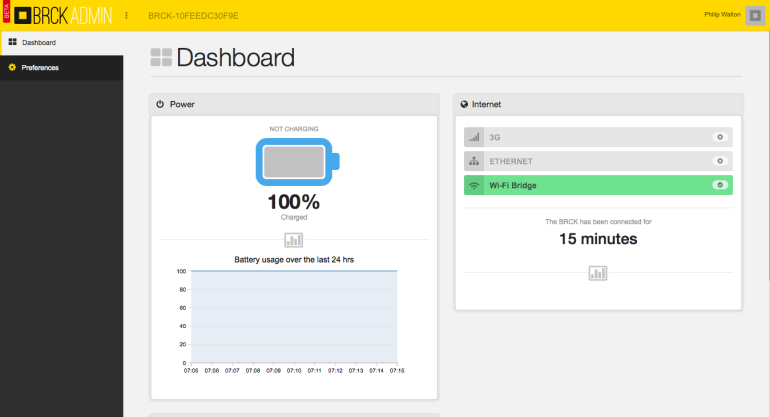
BRCK Cloud Dashboard
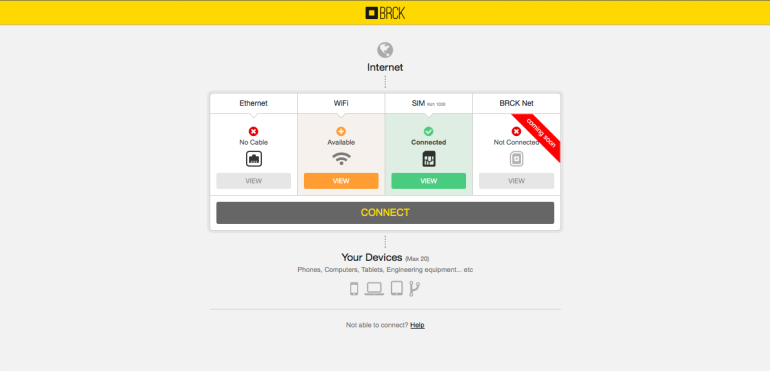
BRCK Local Dashboard
4) Source of Internet – in order for the BRCK to get registered you will need a working source of Internet. The easiest way to achieve this is to connect an ethernet cable from your home router. Another easy way is to insert a pin-unlocked 3G SIM with a data bundle. If neither of these options are available, the BRCK will reroute you to the Local Dashboard where you can connect via WiFi-bridging or configure a locked SIM.
We’re continuing on user testing today and we have instituted some immediate changes to the registration and setup process that make the process clearer and more intuitive. For those who have already received BRCKs, free free to get in touch with us at [email protected] and we’re happy to help you with any setup issues along the way. We are also going to put out an unboxing and setup video this week. We hope that seeing someone setup a BRCK will be a useful guide for getting your own BRCK registered and configured.
Finally, we know that many of you are eagerly awaiting receipt of your BRCKs. We are finally make strides at getting our daily production volumes up and we expect to have the backlog cleared within the next 2 – 3 weeks. We do apologize that this UX issue is going to delay shipping for a couple of days but we believe that it will be worth it if you are able to more fully enjoy your BRCK unboxing and setup experience.